


Freshly-baked bread is such a treat. And while sourdough bread was all the rage, it was just too much effort for me. I did get into the famous No Knead bread that has you starting the process the night before – great if you remember to do that. Then, I found a half day recipe but wanted to make that an even simpler process. I’m all about my food processor so I figured out how to make the half day version with this lifesaver (that also keeps the kitchen a lot cleaner), made it a bunch of times, and figured out all the tips and tricks to make it turn out great every time. I couldn’t wait to share it with RealFoodTraveler.com readers. So here it is, my full-proof recipe for making half day, no knead bread using a food processor.
Keep this recipe handy by saving it to Pinterest.
Hungry for more? Find out what it’s like to use the Challenger Bread Pan
![]()
Real Food Traveler’s Recipe for
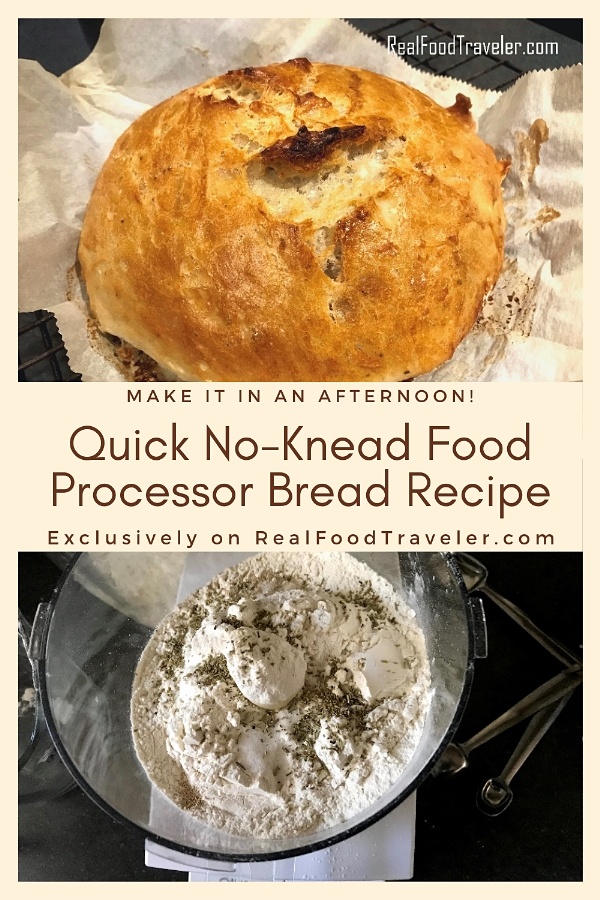
Half-Day No Knead Bread Using a Food Processor
Makes one loaf

Start with all dry ingredients in your food processor. Photo by RealFoodTraveler.com.
Ingredients:
3 cups all-purpose flour
1/4 tsp yeast (active dry or instant but make sure it’s fresh)
1 1/2 tsp salt
1 1/2 cups hot water (NOT boiling! If it’s too hot, it’ll kill your yeast and your bread won’t rise. From your sink is fine to the point that it’s a little to uncomfortable for your hand, about 125-130 degrees)
2-3 TBS extra flour, set aside, to dust your surface
Optional:
1/2 tsp garlic powder
1-1 1/2 TBS dried rosemary
Hungry for more? Get the famous Cinnamon Bread recipe from Dollywood.
Method:
- With the metal blade (not dough blade) in your food processor (I love my Cuisineart), add all of the dry ingredients (including the garlic powder and/or rosemary if using).

Here’s the wet dough fresh out of the food processor and before it begins its multi-hour, leave-it-alone, rising. Photo by RealFoodTraveler.com.
- Give it a few pulses to make sure all ingredients are mixed and slightly aerated.
- Add the hot water through the feed tube while running the processor until the water and dry ingredients are combined. The consistency should be stringy and a little wet, not a ball.
- Using a scraper, (I like the ones that are curved on one end and straight on the other), dump the dough out into a large mixing bowl.
- Cover with plastic wrap sealed around the edges and cover with a dish towel. Or, if you have one, I find a silicone lid works great instead of the dish towel.
- Let the dough stand minimum 3 hours but up to about 5. Check it – it should be puffy with bubbles on the surface.
- Using the scraper again, plop the dough out onto a floured surface, like a flexible plastic cutting board (I love these because you can clean and store them so easily). Keep the piece of plastic wrap – you’ll use it again in an upcoming step.
- Sprinkle the top of the dough with a little flour and, using the scraper again, do a few lift-and-fold-over motions to the dough. You aren’t kneading it with your hands but you are incorporating a little flour. At this point, it should be a soft ball of dough.
- Prep a piece of parchment paper that’s larger than the bread but small enough to fit into your baking pan (more on that below).
- Pick up your dough ball and place it in the middle of the parchment paper. Cover it with the piece of plastic wrap you used before. Let it rest for about 30 minutes while…
- Place your baking pan in a cold oven, on the lower rack, with its lid. Set the oven to 450 degrees, letting the pan come up to temperature as the oven heats. Depending on your oven, this can take 30-40 minutes. Let your dough rest (and rise a little more) as the oven heats.
- Before putting the bread in the pan, take a very sharp knife (I’ve even used the pointy edge of my Cuisineart blade) to make an X in the top of the dough. This ensures that when your bread splits, as it will do, it slits into a pattern. I don’t always remember to do this but we don’t really care since we gobble up the bread right away. But some people, and professionals, use a pro tool, a “lame razer slasher” and make exquisite designs in their dough before baking. Someday I’ll be this talented!

After 3-5 hours, this is what the dough will look like. Photo courtesy RealFoodTraveler.com.
- When your baking pan is ready, using oven mitts, open your oven and lift off the baking pan lid. Lift up your parchment paper and dough and carefully place it into the pan. Add a couple of ice cubes to the pan to create moisture, which helps bread rise while baking), and replace the lid.
- Bake with lid on for about 20 minutes. Then remove the lid and bake another 7-10 minutes. Don’t let it get too dark.
- Remove the bread to a cooling rack so that there’s air all around the bread. Let it cool for at least 15 minutes (it’s so hard to wait, we get it). We use one of our stackable cooling wracks which are great for cooling cookies and letting homemade pasta rest.
- Slice using a sharp, serrated bread knife. One trick we’ve heard of that works well is to cut a small slice off of one edge, then stand the loaf up on that edge and slice from the top side down. This helps keep the bread from “crushing,” especially if you’ve made a lovely design on it. The bread is great with butter, perfect for dipping into delicious pasta sauces or soups and stews, or toasted served with an over-easy egg on top.


Hungry for more? Here’s a recipe for Icelandic Rye Bread.
Bread pans to use to make Half-Day No Knead Bread with a Food Processor
When I first started making this bread, I used my trusty Le Creuset Dutch Oven, which I use for so many things, it’s ridiculous. It works great for this recipe. But I also use my Challenger Bread Pan, a more oval cast-iron pan made specifically for baking bread (but pizza does well too). Among its features is that you can place the dough and parchment paper (if you want to use parchment) on the flat base and then put the domed lid on top. That’s easier than placing the dough down inside the Le Creuset (I’ve been known to drop it in by accident making it lose it’s pretty, round shape). We have an affiliate link to the Challenger pan where you can also buy other bread-making equipment.
Hungry for more? Imagine making bread over a hot stone in the desert.

My very rustic, finished, and delicious loaf of Half Day No Knead Bread using a Food Processor. Photo courtesy RealFoodTraveler.com.

Here’s the loaf I made using the Challenger Bread Pan. Photo courtesy RealFoodTraveler.com.
Please note, RealFoodTraveler.com is a participant in the Amazon Services LLC Associates Program, an affiliate advertising program designed to provide a means for sites to earn a small amount of advertising fees by linking to Amazon.com while providing convenience for the reader. We are also a participant in the Challenger Bread affiliate program and may earn a small percentage from any sales.


0 Comments