


The pandemic has led to a bread-baking boom. Lots of people have made themselves a little crazy pursuing the art of making sourdough starter. I haven’t gone that route yet, but I have been trying to master making a great loaf of bread to enjoy with our meals. At the same time, I’ve been fiddling with a same-day version of the tried-and-true No Knead bread that normally requires planning and prepping from the night before. Motivated by not being great at planning ahead, I think I’ve got the recipe and method down pat (click the blue button below for my recipe). But the thing that made it a real success was a new pan I was provided to try out and tell Real Food Traveler readers about -The Challenger Bread Pan which takes the best of a cast iron pan and caters it to better bread baking – and more. Bonus? You’re going to have this pan forever, maybe even to pass down to your kids, full of delicious memories!
Add this pin to your bread-making Pinterest board.

Images and graphic by Challenger Breadware and RealFoodTraveler.
Hungry for more? Here’s my half-day, no-knead, food processor bread recipe.
What’s special about the Challenger Bread Pan:
- It was made by bread bakers (Jim Challenger and his wife, Lisa) for bread bakers (you and me!).
- One of the most important features of The Challenger Bread Pan is the design, with a shallow base that makes it easy to place your ready-to-bake dough on it; a high lid to allow for plenty of rise; and handles placed in logical spots to make it easier and more ergonomic to maneuver. It also keeps the steam in, eliminating extra equipment such as the commonly-advised tray of hot water in the bottom of the oven.
- The thick, black cast iron provides radiant heat – no cool spots and no enamel to chip – I’m talking to you, my enameled cast iron dutch oven.
- The pan can be used to make any kind of bread from boules to baguettes to cinnamon rolls and pizza.
- It can also be used on the stove top as a griddle for pancakes.
- The whole thing can be turned over with the lid becoming a great, deep pan for making other meals, with the base serving as the lid. I made a delicious dish of chicken thighs and root vegetables that came out perfectly. See that picture, below.
It’s helpful to bake your bread on a sheet of parchment paper on the Challenger Bread Pan because it makes it easier to slide it from your cutting board to the pan and keeps the pan cleaner.
Hungry for more? Get the recipe for a unique style of butter to slather on your bread.
Tips for making your bread turn out better, using the Challenger Bread Pan:
- Pre-heat the pan to 450—500°F for at least 30 minutes. Place your rack in the middle or just below middle position of the oven, but not the lowest level. Jim Challenger told me he likes to let it heat up nearly an hour for best results and because ovens vary in the time they take to pre-heat.
- The pan can accommodate 1.5 kilos. One reader we heard from baked a 3-pound batard in the pan that turned out great.
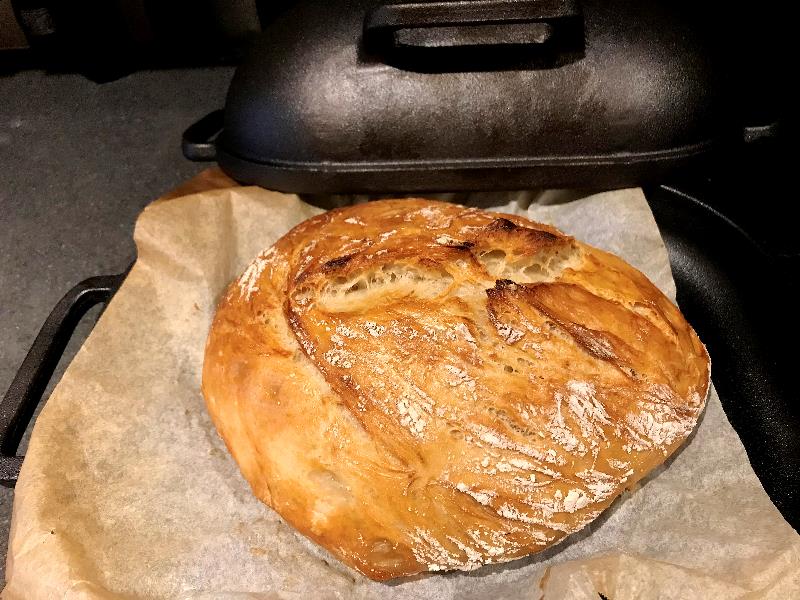
- For the final rise of the dough, place it on a sheet of parchment paper, then lift that and place it (dough and parchment) on the flat bottom of the Challenger Pan. (I didn’t do that once and my otherwise beautifully-scored dough stuck to the cutting board and ooozed/plopped onto the pan, losing its nice shape. You can see that in the image above – not perfect but it tasted great.)
- Before putting the domed lid over the pan, add a few ice cubes to the parchment paper and then quickly put the lid on. The steam created by the melting ice cubes helps the bread get its final rise in the pan. This is in place of the usual method of putting a tray of water in the lower rack of the oven.
- Part way through cooking, when it’s time to remove the domed lid, remove both parts – the lid and the flat part of the bread pan that has your bread on it – and place it on the top of your stove or somewhere where it will be stable and not burn your surface. Then, put the domed lid back in the oven, turning it over so the open side is facing up. Then, put the flat side of the bread pan, with the bread and parchment paper on it, on top of that open side. Your bread is now uncovered and raised up. The purpose of this is to help prevent the bottom of your bread from burning while still allowing the uncovered bread to brown. This takes some effort since you’re maneuvering burning hot, heavy items and a hot oven.
- Lift with your thighs! The pan, lid and base, are about 19 pounds which gets awkward and feels pretty darned heavy when you’re bending over putting it into and removing it from the oven. The placement of the handles is helpful though so you can grab where it works best for you.
- Read the website thoroughly because it contains information about how to maintain your pan, recommendations for the right kind of flour all over the world, tools of the trade, a helpful glossary, and more.
The Challenger Baking Pan can be purchased on the Challenger website. You can also get more information about the pan, ingredients, tools, and recipes there. Please note that the links we’ve included here are part of an affiliate program with Challenger Breadware. That means that, if you purchase an item from their website, Real Food Traveler may receive a small commission. However, that doesn’t change the pricing or shopping experience for you in any way.
— Story and photos, except where noted, by Courtney Drake-McDonough, publisher and managing editor, RealFoodTraveler.com

Chicken thighs with roasted vegetables cooked perfectly in the overturned lid of the Challenger Bread Pan.
Hungry for more? Bake some bread to go with this recipe for Pasta Bolognese.
Update for 2021: Since writing this article, we’ve found out that the Challenger company is coming out with even more great products, including Sourdough Starter Jars that let you clearly and easily track starter growth. They are made out of borosilicate, a non-porous, lead- and BPA-free glass, with a rubber sealed, bamboo lid. Visit the website to learn more and to find out about new products as they are released.


0 Comments